Nano Server基本配置和管理
作者:网络转载 发布时间:[ 2016/3/15 10:24:34 ] 推荐标签:软件测试管理 配置管理
这一篇主要是对Nano Server进行一些基本的配置,如IP地址,计算机名等。其实这一篇应该跟提取Nano Server合起来说才对的,因为很多都是要利用dism工具来对映像进行操作。
一、设置IP地址
在用dism制作完我们所希望的Nano映像之后,以虚拟机的方式打开,如果当前的环境没有DHCP服务,那么是无法对Nano Server进行一个远程的管理,也不能在Nano Server本地进行设置IP地址。所以如果没有DHCP服务,那么尽可能在制作Nano时把IP地址也一并设置好,这当然是利用脚本的方式。
1、如果之前做Nano时有保留一个备份的映像,那么现在可以利用。(PS:我是有做备份的习惯,因为重新制作一个太烦。)
dism /Mount-Image /ImageFile:.Nano.vhdx /Index:1 /MountDir:.mountdir

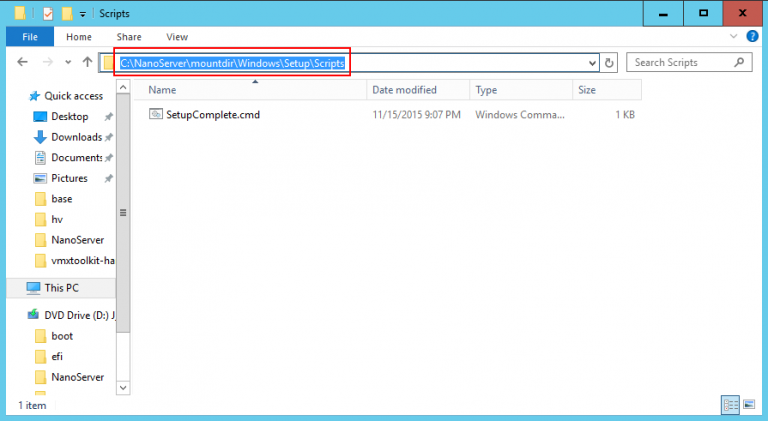
2、然后在Windows下新建Setup的文件夹,再在Setup里面新建Scripts的文件夹,后的路径是<mountdir>WindowsSetupScripts, 把设置IP地址的脚本拷贝进去。(PS:脚本名字一定要命名为SetupComplete.cmd)

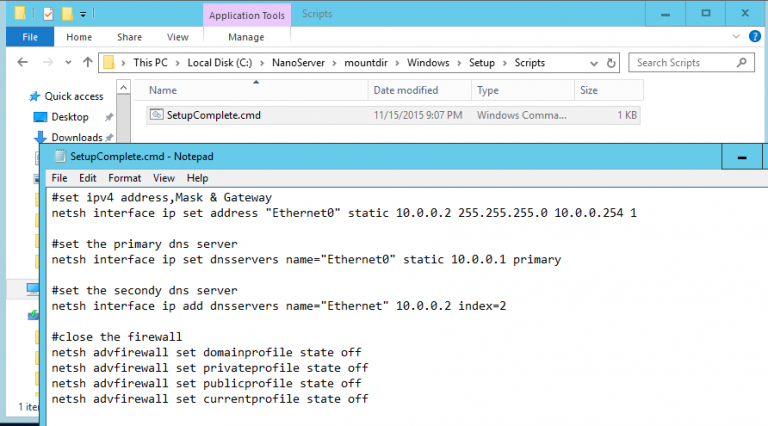
3、下面是SetupComplete.cmd的脚本内容,IP地址以10.0.0.2为例。
netsh interface ip set address "Ethernet0" static 10.0.0.2 255.255.255.0 10.0.0.254 1
netsh interface ip set dnsservers name="Ethernet0" static 10.0.0.1 primary
netsh advfirewall set domainprofile state off
netsh advfirewall set privateprofile state off
netsh advfirewall set publicprofile state off
netsh advfirewall set currentprofile state off

二、设置计算机名。
考虑到Nano Server要进行加域,所以计算机名也好先规划好,在制作之前也一并进行设置。这里是利用应答文件来进行设置计算机名。
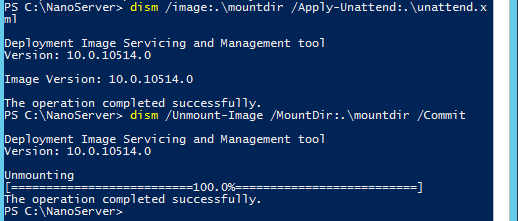
4、利用dism把应答文件给打到Nano映像里面去,同样的,应答文件的名字也必须为unattend.xml。
dism /Image:.mountdir /Apply-Unattend:.unattend.xml

相关推荐

更新发布
功能测试和接口测试的区别
2023/3/23 14:23:39如何写好测试用例文档
2023/3/22 16:17:39常用的选择回归测试的方式有哪些?
2022/6/14 16:14:27测试流程中需要重点把关几个过程?
2021/10/18 15:37:44性能测试的七种方法
2021/9/17 15:19:29全链路压测优化思路
2021/9/14 15:42:25性能测试流程浅谈
2021/5/28 17:25:47常见的APP性能测试指标
2021/5/8 17:01:11


 sales@spasvo.com