玩转Asp.net MVC 的八个扩展点
作者:网络转载 发布时间:[ 2016/3/25 9:44:37 ] 推荐标签:测试开发技术 编程语言
接下来开始编写不同风格的View了,重点在于编写的View文件夹组织方式要跟ThemeViewEngine中定义的路径要一致,以ServiceController为例,我们编写ocean和sky两种风格的View:
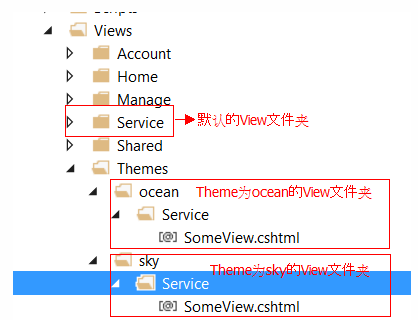
后在web.config制定一种Theme:,ocean文件夹下的View将会被优先采用:

五、Validator
通过在Model属性上加Attribute的验证方式是MVC提倡的数据验证方式,一方面这种方式使用起来比较简单和通用,另一方面这种统一的方式也使得代码很整洁。使用ValidationAttribute需要引入System.ComponentModel.DataAnnotations命名空间。
但是有时候现有的ValidationAttribute可能会不能满足我们的业务需求,这需要我们自定义自己的Attribute,例如我们自定义一个AgeValidator:
public class AgeValidator: ValidationAttribute
{
public AgeValidator()
{
ErrorMessage = "Please enter the age>18";
}
public override bool IsValid(object value)
{
if (value == null)
return false;
int age;
if (int.TryParse(value.ToString(), out age))
{
if (age > 18)
return true;
return false;
}
return false;
}
}
自定义的AgeValidator使用起来跟MVC内置的ValiatorAttribute没什么区别:
[Required]
[AgeValidator]
public int? Age { get; set; }
不过我们有时候可能有这种需求:某个验证规则要针对Model中多个属性联合起来判断,所以上面的方案无法满足需求。这时候只需Model实现IValidatableObject接口即可:
public class UserViewModel:IValidatableObject
{
public string Name { get; set; }
[Required]
[AgeValidator]
public int? Age { get; set; }
public IEnumerable Validate(ValidationContext validationContext)
{
if(string.IsNullOrEmpty(Name))
yield return new ValidationResult("the name can not be empty");
if (Name.Equals("lucy"))
{
if(Age.Value<25)
yield return new ValidationResult("lucy's age must greater than 25");
}
}
}
六、ModelBinder
Model的绑定体现在从当前请求提取相应的数据绑定到目标Action方法的参数中。
public ActionResult InputAge(UserViewModel user)
{
//...
return View();
}
对于这样的一个Action,如果是Post请求,MVC会尝试将Form中的值赋值到user参数中,如果是get请求,MVC会尝试将QueryString的值赋值到user参数中。
假如我们跟客户的有一个约定,客户端会POST一个XML格式的数据到服务端,MVC并不能准确认识到这种数据请求,也不能将客户端的请求数据绑定到Action方法的参数中。所以我们可以实现一个XmlModelBinder:
public class XmlModelBinder:IModelBinder
{
public object BindModel(ControllerContext controllerContext, ModelBindingContext bindingContext)
{
try
{
var modelType = bindingContext.ModelType;
var serializer = new XmlSerializer(modelType);
var inputStream = controllerContext.HttpContext.Request.InputStream;
return serializer.Deserialize(inputStream);
}
catch
{
bindingContext.ModelState.AddModelError("", "The item could not be serialized");
return null;
}
}
}
有了这样的自定义ModelBinder,还需要通过在参数上加Attribute的方式启用这一ModelBinder:
public ActionResult PostXmlContent([ModelBinder(typeof(XmlModelBinder))]UserViewModel user)
{
return new XmlResult(user);
}
我们使用PostMan发送个请求试试:
刚才我们显示告诉MVC某个Action的参数需要使用XmlModelBinder。我们还可以自定义一个XmlModelBinderProvider,明确告诉MVC什么类型的请求应该使用XmlModelBinder:
public class XmlModelBinderProvider: IModelBinderProvider
{
public IModelBinder GetBinder(Type modelType)
{
var contentType = HttpContext.Current.Request.ContentType.ToLower();
if (contentType != "text/xml")
{
return null;
}
return new XmlModelBinder();
}
}
这一Provider明确告知MVC当客户的请求格式为text/xml时,应该使用XmlModelBinder。
public class MvcApplication : System.Web.HttpApplication
{
protected void Application_Start()
{
ModelBinderProviders.BinderProviders.Insert(0, new XmlModelBinderProvider());
//...
}
有了XmlModelBinderProvier,我们不再显示标记某个Action中的参数应该使用何种ModelBinder:
public ActionResult PostXmlContent(UserViewModel user)
{
return new XmlResult(user);
}
七、自定义ControllerFactory实现依赖注入
MVC默认的DefaultControllerFactory通过反射的方式创建Controller实例,从而调用Action方法。为了实现依赖注入,我们需要自定义ControllerFactory从而通过IOC容器来创建Controller实例。
以Castle为例,需要定义WindsorControllerFactory,另外还要创建ContainerInstaller文件,将组建注册在容器中,后通过ControllerBuilder.Current.SetControllerFactory(new WindsorControllerFactory(container));将MVC的ControllerFactory指定为我们自定义的WindsorControllerFactory。
为了简单起见,这一Nuget包可以帮助我们完成这一系列任务:
Install-Package Castle.Windsor.Web.Mvc
上面提到的步骤都会自动完成,新注册一个组件试试:
public class ProvidersInstaller:IWindsorInstaller
{
public void Install(IWindsorContainer container, IConfigurationStore store)
{
container.Register(Component.For().ImplementedBy().LifestylePerWebRequest());
}
}
Controller可以进行构造器注入了:
private readonly IUserProvider _userProvider;
public ServiceController(IUserProvider userProvider)
{
_userProvider = userProvider;
}
public ActionResult GetUserByIoc()
{
var user = _userProvider.GetUser();
return new XmlResult(user);
}
八、使用Lambda Expression Tree扩展MVC方法
准确来说这并不是MVC提供的扩展点,是我们利用Lambda Expression Tree写出强类型可重构的代码。以ActionLink一个重载为例:
public static MvcHtmlString ActionLink(this HtmlHelper htmlHelper, string linkText, string actionName, object routeValues, object htmlAttributes);
在Razor页面,通过@Html.ActionLink(“Line item 1″, “OrderLineItem”, “Service”, new { id = 1 })可以生成a标签。这一代码的缺点在于Controller和Action都以字符串的方式给出,这样的代码在大型的软件项目中不利于重构,即便Controller和Action字符串编写错误,编译器也能成功编译。
我们可以利用Lambda Expression Tree解析出Controller和Action的名称。理论上所有需要填写Controller和Action字符串的方法都可以通过这一方法来实现。具体实现步骤参考Expression Tree 扩展MVC中的 HtmlHelper 和 UrlHelper。下面给出两种方法的使用对比:
<div class="row">
<h2>Mvc way</h2>
<ul>
<li>@Html.ActionLink("Line item 1", "OrderLineItem", "Service", new { id = 1 }) </li>
<li>@Html.ActionLink("Line item 2", "OrderLineItem", "Service", new { id = 2 })</li>
<li>@Url.Action("OrderLineItem","Service",new {id=1})</li>
<li>@Url.Action("OrderLineItem","Service",new {id=2})</li>
</ul>
</div>
<div class="row">
<h2>Lambda Expression tree</h2>
<ul>
<li>@Html.ActionLink("Line item 1", (ServiceController c) => c.OrderLineItem(1))</li>
<li>@Html.ActionLink("Line item 2", (ServiceController c) => c.OrderLineItem(2))</li>
<li>@Url.Action((ServiceController c)=>c.OrderLineItem(1))</li>
<li>@Url.Action((ServiceController c)=>c.OrderLineItem(2))</li>
</ul>
</div>
相关推荐

更新发布
功能测试和接口测试的区别
2023/3/23 14:23:39如何写好测试用例文档
2023/3/22 16:17:39常用的选择回归测试的方式有哪些?
2022/6/14 16:14:27测试流程中需要重点把关几个过程?
2021/10/18 15:37:44性能测试的七种方法
2021/9/17 15:19:29全链路压测优化思路
2021/9/14 15:42:25性能测试流程浅谈
2021/5/28 17:25:47常见的APP性能测试指标
2021/5/8 17:01:11






 sales@spasvo.com